 |
www.riscos.com Technical Support: |
7 Using !Mail
7 Using !Mail |
First ensure that both the Internet server, !Connect and the client application !Mail have been installed and correctly configured (see Setting up, Configuring the Internet server and Configuring !Mail).
(If you do not intend to use the Web browser, you do not need to load !WebServe as well.)
Alternatively, you can start the mail server automatically by including lines similar to the following in your boot file:
Filer_Boot adfs::4.$.Network.!SerialDev
Filer_Run adfs::4.$.Network.!Internet
Filer_Run adfs::4.$.Network.!Connect
Filer_Boot adfs::4.$.Network.!WebCache
Filer_Run adfs::4.$.Network.!WebServe
(This assumes the applications are stored in a directory entitled Network in the root of your hard disc.)
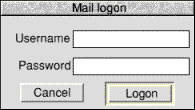
Double-click on the !Mail icon and the logon dialogue box will appear on your screen (except when you are a single user):

|
|
The Mail icon ![]() will appear
on your icon bar, grey at first, then red with your user name
underneath once your logon has been authenticated:
will appear
on your icon bar, grey at first, then red with your user name
underneath once your logon has been authenticated: ![]()
When there is mail waiting for you, it will appear like this:
![]()
If Post_In and Post_Out have not been set (see Setting up !Post_In and !Post_Out directories), or if the network is down, or mail server machine not switched on, the postbox icon will appear with a question mark.
You can now connect with the Internet.
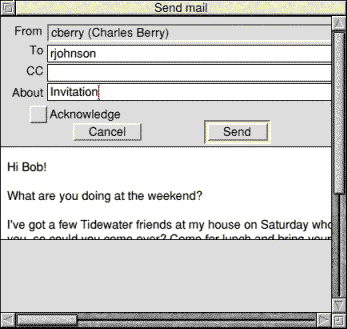
To send mail, you must first write the text of your mail message in Edit or other plain text editor. Don't worry about addresses - just start at "Hi Bob," (or whatever) and end at "Regards, Chuck". Save this Edit file onto the Mail icon (on the icon bar). The mail window will be displayed:
| (From)
your name (entered automatically)
(To) type in the destination name and address (if more than one name, separate by a comma). You can use distribution lists, too
Anyone to be copied (cc)
Your message Click to send Drop any attachments you want to send in the blank area at the bottom of the window |  |
The text of your message will be displayed in the message area, and your name will be filled in automatically.
All you have to do is to fill in the name and address of the person you are sending the message to, (optionally) anyone to be sent a copy (CC - stands for carbon copy, using an old analogy!) and the About field. Take care with the name and address of the recipient - they are often long and obscure and easy to get wrong: if you make a mistake, however small, the mail will not get through.
For local email (to other users on the same site), their user name alone is enough to send them a message. The user group name is not required.
Drag any attachments you also want to send, such as other text files or pictures, for example, to the bar at the bottom of the window; these will accompany your message when it is sent, as long as the destination machine understands RISC OS and the standard MIME email format. If Acorn Internet software is running at both ends, attachments will arrive as posted.
If you want to change the message, or any of the attachments, at this stage, click on the Cancel icon, and start again.
When you are happy with your message, click on Send, and the message will be sent next time you are connected with your service provider (see Connecting with the Internet).
You can make reasonably sure that the message you send has been delivered and/or read by its addressee, by choosing Acknowledge. For remote mail a check is made that it has been written to the recipient's mail server; local machines check that the message has been opened on the addressee's computer.
Incoming mail is held in a mail box at your service provider, and is downloaded when you connect.
Any mail held for you by your service provider will be downloaded automatically as soon as you connect (see Connecting with the Internet); however, it is sometimes useful to check directly if there is any mail for you.
When you have connected with your service provider, choose Finger from the !Connect icon bar menu. Check that your node name is entered correctly in the dialogue box and click on the button. Whether or not your service provider has any mail for you will be indicated on the Server log.
When your mail icon looks like this: ![]()
you have a mail message waiting on your local server.
To read it, click on the mail icon; your current mail folder will
appear:
| The top message is unread
You have read the lower one |  |
To read a mail message, double-click on it, and it will be displayed in a message window.
Any attachments enclosed can be run by double-clicking on them, or they can be dragged and saved in another location.
To reply to a message which you have just read (see
above), click on ![]() . Two things will happen:
. Two things will happen:

|
|
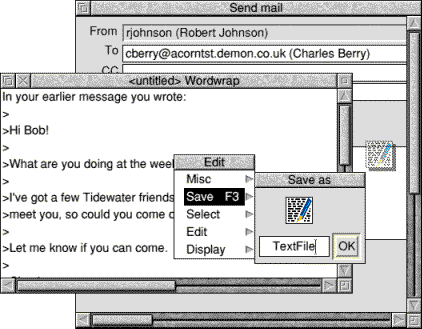
Edit the read message as you want to (or delete it altogether) and insert your reply text.
Save the reply into the Send mail window. The reply destination is already filled in, but you can change it and add or delete CC addressees if you want to.
You can add any attachments to be sent by dragging them to the bottom of the window (see Sending mail). They can be deleted using the Menu option available over the Send mail window.
Click on Send, naturally enough, to despatch the email.
Forwarding a mail message works very much like replying to one.
Click on ![]() in the Mail window
when you have read a message.
in the Mail window
when you have read a message.
The message is repeated in an Edit window, in case you want to add anything to it. To forward the message, you save it into the Send mail window, but this time you have to add the name of the addressee as well.
When you have read a mail message, and do not wish
to keep it, press ![]() and the message will
be removed.
and the message will
be removed.
When you have read a mail message, and wish to save
it, press ![]() and a Save dialogue box
will be displayed, allowing you to save the mail message to a
directory, printer or another application.
and a Save dialogue box
will be displayed, allowing you to save the mail message to a
directory, printer or another application.
Connect retains outgoing mail until you connect with your service provider.
Similarly, mail and news held for you by your service provider cannot be downloaded to Connect until you make this connection, nor can you browse the Web.
When you are ready to connect, choose Choose Connect/Mail only or /Mail and news to connect via the modem to your service provider. Any mail to be sent will then be despatched over the Internet, and mail addressed to you will be downloaded by your service provider. You can then use the Web browser, too.
When you have finished with your connection, choose Disconnect from the Connect main menu.
When you have finished using !Mail, you can log off from the mail system by choosing Bye from the !Mail icon bar menu.
This will produce a log-in dialogue box for the next user.
To exit !Mail altogether, choose Quit.