|
Configuring Alarm
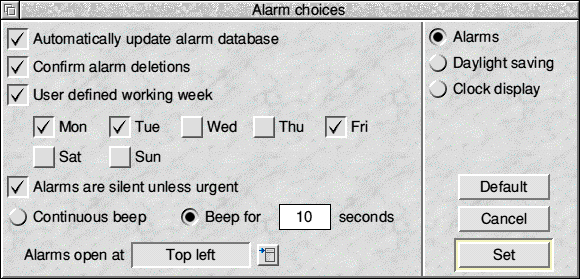
If you click on Choices on the menu the window shown below will open.

Most of the settings in this window are concerned with the way that alarms operate and so their function may not be clear until you have read the section on Setting Alarms.
Automatically update alarm database
The alarm database, the list of alarms you have set, is stored in a special file inside !Boot. If this is set then whenever you alter or set an alarm this file is automatically updated so that the next time Alarm starts up all your settings are remembered.
Confirm alarm deletions
If this is set then you are asked to confirm before an alarm is deleted to guard against you accidentally removing an alarm.
User defined working week
If this is set then alarms will operate within the user defined working week below the option, if working week is chosen when setting alarms. When not selected, the working week will default to the local territory's working week and will be shown by the faded days of the week icons.
Alarms are silent unless urgent
If this is ticked then only urgent alarms will sound a 'beep', if it isn't set then all alarms will sound a 'beep'.
Beep duration
If Continuous beep is selected then, when an alarm is triggered, it will sound until you turn it off. If you select Turn beep off after then the beep will sound for the number of seconds entered and then turn itself off
Alarms open at
This allows you to configure one of 5 screen positions for new Alarm windows to open at. The choices are each corner of the screen area above the Iconbar or centred.

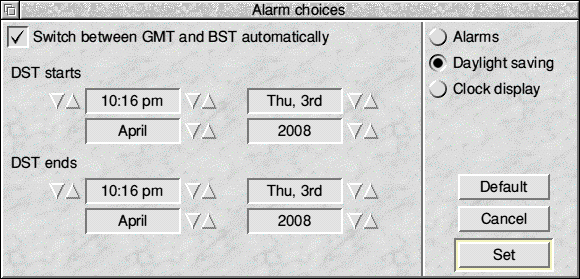
Switch between GMT and BST automatically
The exact name of this option depends on your currently selected Territory. The picture above has been taken from a computer configured for the United Kingdom. If the option is set, Alarm will automatically switch between Daylight Saving Time and conventional time on the dates specified.

Clock display
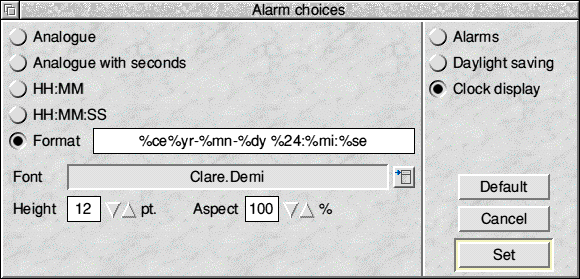
This lets you set the appearance of the icon bar display.
The first four Radio buttons at the top let you choose between Analogue with seconds, Analogue without seconds, HH.MM (digital without seconds) or HH.MM.SS (digital with seconds).
There is also an icon where you can enter your own format string for the display. Many people will not want to do this, so it is not described in detail. However there is a list of the formatting parameters at the end of this section for those that wish to experiment.
If you have selected one of the digital display formats, there is the option to select the font in which to display the clock, along with height and aspect. These are limited to sensible values for most fonts.

|
![[Select]](../images/ro6doc.gif)
![[Select]](../images/ro6doc.gif)