 |
www.riscos.com Technical Support: |
5 Configuring the Web browser
5 Configuring the Web browser |
You must configure !WebServe (the Web browser proxy/cache server) and the browser itself, !Browse.
Note: the Browser has been designed to work on a single machine, or over a network. So if you are a single user, you will see options which do not apply to your use.
Web pages usually contain colour images, hence tend to be large in file size. Some even contain audio and full-motion video files as well, so they take a comparatively long time to load down the telephone line or network.
For this reason it is very useful to be able to 'cache' (store) frequently-used pages nearer to the computer where they are to be viewed. Pages can be cached on a stand-alone computer or on a 'cache-server' for a local network if you have one.
Your Internet service provider may also offer a cache server at its point of presence, to cut out the time taken to load pages from the Internet itself. You may also wish to use a third-party cache, such as that at Demon (see below).
The Acorn Internet proxy/cache server (!WebServe) allows your computer to cache pages locally and to look for them on a remote server. You should configure this before you start using the Web browser.
Double-click on the !WebServe icon (in !Boot.Resources) to load the application onto your icon bar.
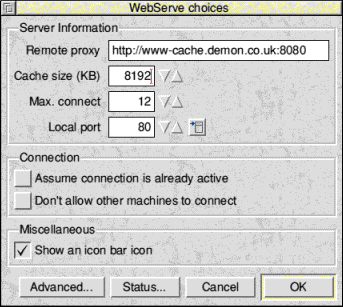
Click Adjust on the WebServe icon bar icon to display the WebServe choices dialogue box (or choose Choices... from the icon bar menu):
|
Enter the following details for Webserve:
|
Clicking Select on the WebServe icon bar icon (or choosing Status... from the menu) will display the current status of proxy cache access.
The Web browser will cache pages on a machine's hard disc in an application called !WebCache, which !WebServe expects to find in the same directory as itself.
Load !Connect, then choose Admin/Expiry
times/URLs from the !Connect icon bar menu. The URL expiry
times dialogue box will be displayed:
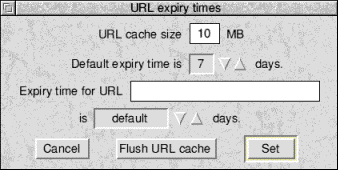
Type in the amount of space on your hard disc you can devote to caching Web pages: a minimum of 10MB is recommended. A larger cache will perform better if you are using the Web heavily. When the space limit is reached, the least-recently-used site will be flushed from the cache.
Set the Default expiry time for cached Web pages. Cached pages will be flushed when they reach their expiry time.
You can specify a different expiry time for (an) individual page(s) if you enter its address in the 'Expiry time for URL' box and set its new expiry time. You will want to flush some pages, such as satellite weather pictures, after only a day or so.
If you need to flush (clear out) your page cache, for whatever reason, choose Flush cache from the WebServe icon bar menu.
!WebServe will only serve pages to users !Connect knows about and who have Web access. If you are using other (possibly non-Acorn) Web Browsers as well as Acorn Internet software, however, it is possible for these browsers to be served pages by !WebServe as a user called `alien' has been registered with !Connect and given Web access. In this way a request for a page from another Browser will not be blocked by !Connect.
Double-click on !Browse to load it onto your icon bar.
You can change the way the Web browser looks by using the options on the Choices icon bar menu to show or hide certain graphical elements in the Web browser window.
There are seven Choices dialogue boxes: the first to be displayed is the Page dialogue box:
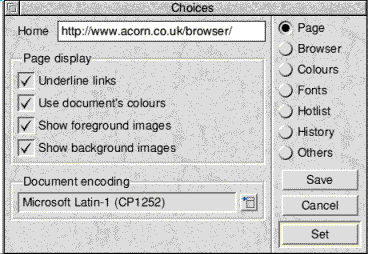 | Page Choices:
|
You can prevent inline images and backgrounds from being loaded when you're viewing pages. Because the Web browser needs to load only the text for the page and not the graphics files associated with any inline images, selecting these options can make page loading much faster.
Changes you make here affect new browser windows only.
Click on Browser to display the Browser window dialogue box:
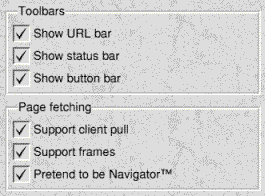
| Browser Choices:
Tick to:
Changes you make here affect new browser windows only.
Not displaying these gives you more room for content on the screen.
Any changes you make here will apply to new page fetches. |
Click on Colours to display the Colours
dialogue box:

|
Choose:
|
Changes you make to Colours will take immediate effect on open windows. HTML pages which specify their own colours will override these choices (unless Display/Use document colours is off for that window).
Click on Fonts to display the Fonts dialogue box:
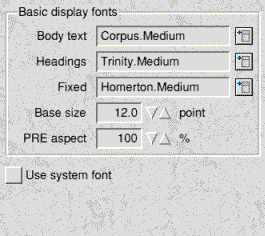
| Font Choices:
|
Changes you make to Fonts will take immediate effect on open windows
Click on Hotlist to display the Hotlist dialogue box:
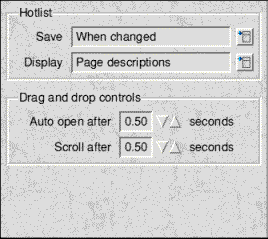
| Hotlist Choices:
|
Any changes you make to the Hotlist will take effect immediately.
Click on History to display the History dialogue box:
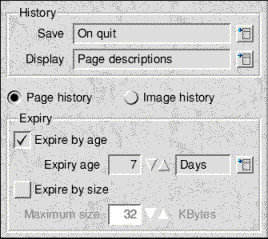
| History list Choices:
|
Any changes you make to the History list will take effect immediately.
Click on Others to display the Others dialogue box:
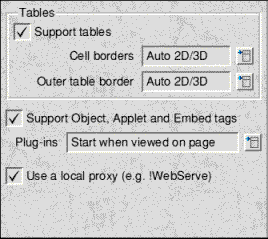
|
|
Sorry, but this is unavailable from the front-end in this version. If you're feeling adventurous, you can always edit the !Browse.Choices file, but always take a backup copy to revert to if things go wrong.